Camera Profiling
Most photographers these days shoot raw files when possible, so you may have noticed a setting for something called a profile, while processing your images. The choice of profile is important, because it influences how the colours will be rendered in the final image, so it’s the first point you should check, before making any further adjustments.
No doubt the developers do their best, but for consistent high quality, camera profiles have to be matched to the lighting conditions for your specific camera when the image was created. In essence, generic standard profiles are heavily compromised by default and do not work well in many cases.
There is a chance you have never looked at this seriously, but custom camera profiles can transform the appearance of your images and you might be shocked how much better the results from your camera can appear if you’ve only tried Adobe Standard or whatever default profile is available for your camera.
There is much more information in my book on colour management, but I’ll skip most of that for this brief overview and just provide you with some basic details.
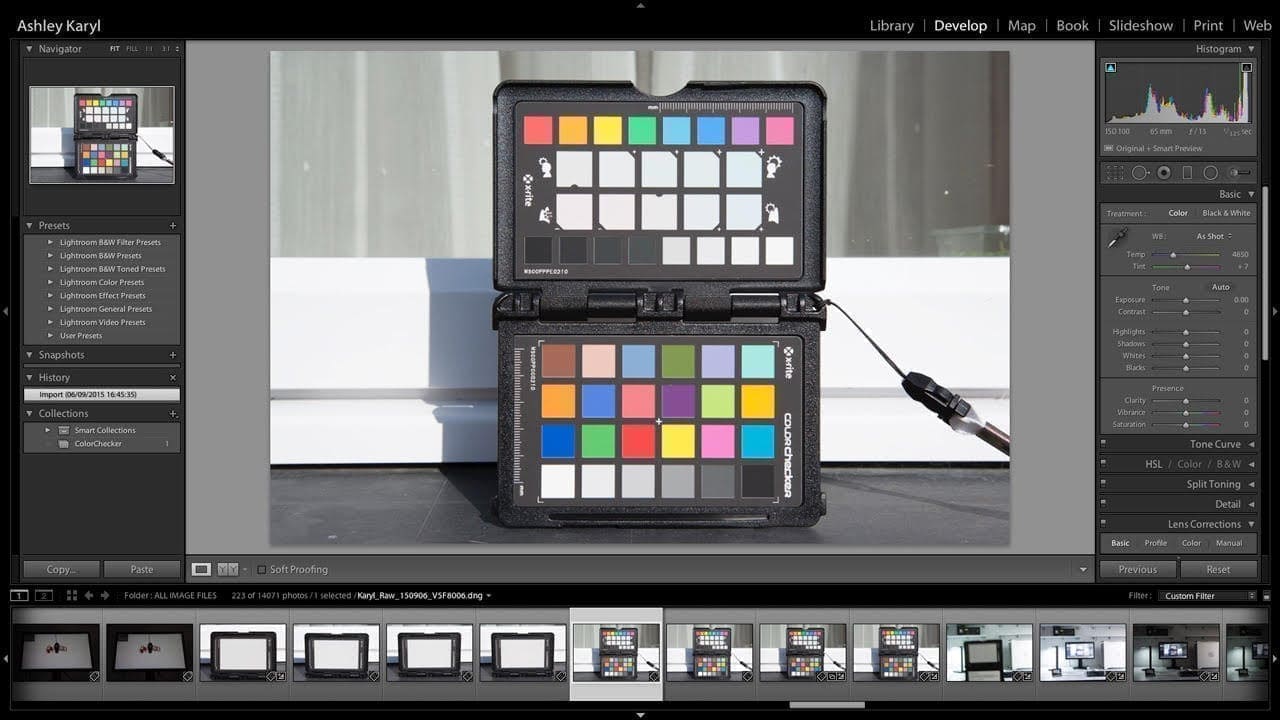
To create custom profiles you should ideally be using Lightroom or Photoshop, because they make it very easy and then you need something called a ColorChecker, which can be big or small, but uses an industry standard layout with 24 colours commonly found in nature.

To create a profile you first need to shoot a properly exposed Raw file image of a chart like X-Rite’s ColorChecker Passport Photo, so that it fills a reasonable amount of the frame.
Now you can import that image onto your computer and convert it to DNG, which can either be done at time of import or separately by using Adobe’s free DNG Converter app.

At this stage it’s simply a question of running that DNG file through the supplied ColorChecker Passport software, which can cleverly identify the colour patches to create a profile.
For convenience, it should be named so that you immediately recognise the camera and relevant conditions, such as 5DIII_Halogen for example. It’s basically a drag & drop operation that takes your computer about a minute to process.
To preview the effects of this profile you will first need to restart Lightroom or Photoshop if it’s already open; then apply it as a profile to your selected image.
If you select an image that has already been adjusted it may lead to strange results, because you made those changes from a different starting point, so it’s better to start with new unadjusted images.

The shift in colours will depend on your camera and the light conditions, but in most cases your colours will suddenly leap to life with richer blues, oranges and purples etc.
Best of all, your colours will now retain the correct relative relationships and if you shoot with more than one camera they can each be matched to a common target, which is of great benefit to professionals, such as wedding photographers who might work with a Canon, while their assistant has a Nikon.
These are the basic points to understand why you should be using custom camera profiles with your photography. In my book Colour Management Pro I go into much greater detail how you can use this to create an efficient workflow, while you could also check out a short video I created here on Camera Jabber.
Ashley Karyl ~ Author of Colour Management Pro https://colourmanagementpro.


